
![]()
![]()
![]()
![]()
![]()
![]()
![]()
![]()
![]()
![]()
![]()
![]()
ANIMATING A CHARACTER IN GAME BLENDER
-1/2-
This tutorial demonstrates how to animate a character using Game Blender. It is divided into two parts : the animation and the logic.
1) First, create a character with this parenting system: (each member must have its center at the end of the preceding member and be parented to it).
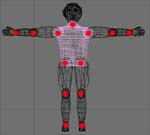
The red dots represent the centers of the
members.
2) Let's continue with the animation part of the tutorial. It consists of three stages: start, walk, and stop. Place the character in a standing pose (you must only use member rotation, no displacements, ie. location!). Insert an animation key for each member (key i > Rot) excluding the forearms and hands (which aren't really required to move during the walking animation). Proceed to frame 10, then position the character as illustrated below and insert a key for each member again. Advance to frame 30 and reverse the members: the left leg takes the position of the right leg and vice versa (don't forget the arms!).
frame 1 ![]() 10
10 30
30 5060
5060![]()
The highlighted leg is always positioned the same in each stage of the walk cycle, (Frames 10-50, displayed above). Notice that, the highlighted leg is positioned exactly the same in frame 30 as the opposite leg in frames 10 and 50. Since frames 10 and 50 are identical, we can continually display frames 10 through 50 to produce a continuous walk cycle. Frames 1-10 represent the start (walking) transition state, while frames 50-60 constitute the stop (walking) transistion state.sss
3) To simplify work and achieve a more precise end result, instead of manually repositioning the members for positions 4 and 5, switch to the IPO Curve Editing Window (Ctrl + left_arrow) and, member by member, duplicate position 2 (in key mode, the small key icon at the bottom; or press the k key, with your mouse cursor in the IPO Window) and position it on frame 50. Repeat this process in the exact same way for position 1 with frame 60. You should obtain this kind of curve for each member:

4) Return to frame one and start the animation (Alt+a) to determine if the results are acceptable. If you were to place a plane underneath the feet, the result would be that they pass through the ground on a regular interval. To correct this, it is necessary to add a location key to each principal position for the body (if the parenting was done correctly, the rest should follow) to raise it (and ONLY for the Y-axes!) so that there is always a foot in contact with the ground (the rules of walking require that one foot must always be in contact with the ground, it's a fact).
Normally, at this juncture, we are done with the animation portion of the tutorial. However, do not hesitate to add intermediary keys (in particular for instances where the feet persist in passing through the ground) for more realism. You should now be ready for the second part of this tutorial.
Today :
Saturday 04 May 2024
Last update : 2001
Blender version : 2.12
![]()
|
results |
||